Because fiber cables are buried underground and run directly to your home or business, our fiber network is much more reliable than services that offer cable or satellite connections. Some providers will claim to provide fiber internet, then connect your home to a fiber network using outdated and unreliable copper wires.
Not to mention the local, friendly customer support you can expect from NCTC.
Fiber optic cables transmit data through pulses of light and at the speed of light. While copper wire technically transfers information that fast, it suffers from speed loss over long distances — something you never have to worry about with fiber. The speed you pay for is the speed you get, for both uploads and downloads.
Building fiber is a complicated process but one that’s already proven its worth. Infrastructure cables are buried in underground ducts. Central connection points, sometimes called pedestals, are constructed in each neighborhood. Homes are connected to pedestals, either through aerial or underground cables, via a fiber interface box installed on each home with as little drilling as possible. In the event that drilling is required, our technicians will first get the consent of the homeowner. Throughout the entire process, we want homeowners to understand what we’re doing and why we’re doing it.
New Service
Yes. Number transfer is typically completed within three to five business days.
Yes, but you may want to wait until our technicians have completed their installation process to avoid service interruptions.
Billing
Either the 15th or 30th of each month, depending on where you live. This information is available on your billing statement or by accessing your account online.
If your statement shows your bill is due on the 30th, then your bill includes charges from the 15th of the current month through the 14th of the next month. You should receive your bill around the 15th of each month.
If your statement shows your bill is due on the 15th, then your bill includes charges from the 1st of the current month through the 30th/31st of the next month. You should receive your bill around the first of each month.
Your First NCTC Bill
Depending on where your installation date falls within the billing cycle, your first bill may include service for more than one full month. After your first bill, you will only be charged what you were quoted, unless you make changes to your account.
NCTC offers several ways to pay, so you can choose the one that’s most convenient for you!
To register your account online, you will need your latest NCTC bill and the amount due.
To register your account for the first time, click here.
If you’ve already registered your account with our system, click here to pay your bill.
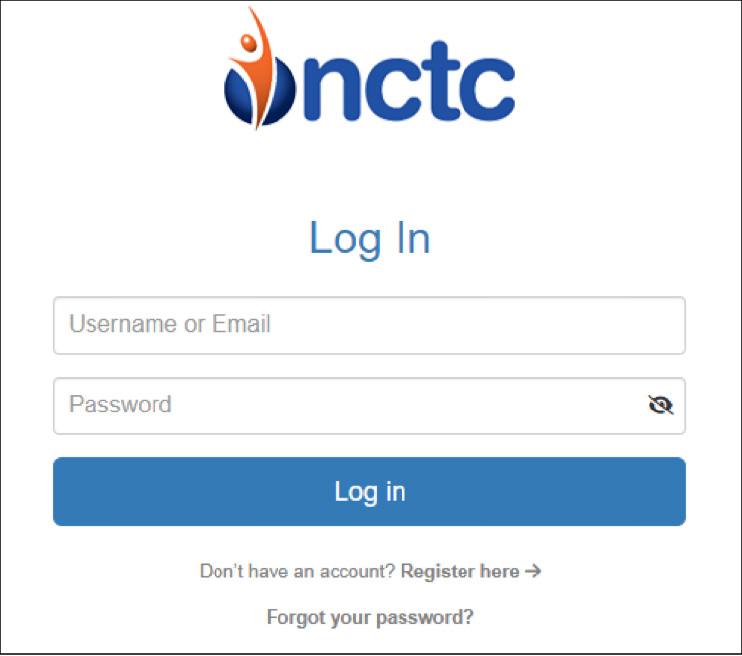
The initial LOGIN page will look like this:
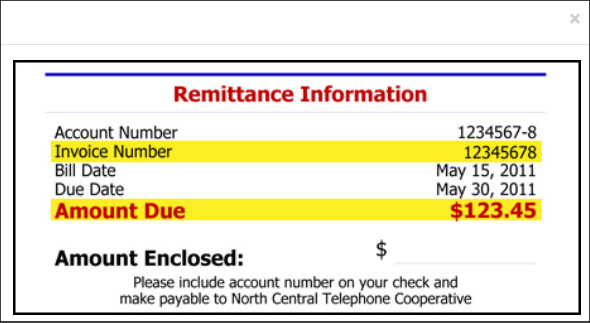
You can click the “What’s This?” link to help identify where you can find the Invoice Number and Amount Due on your bill:
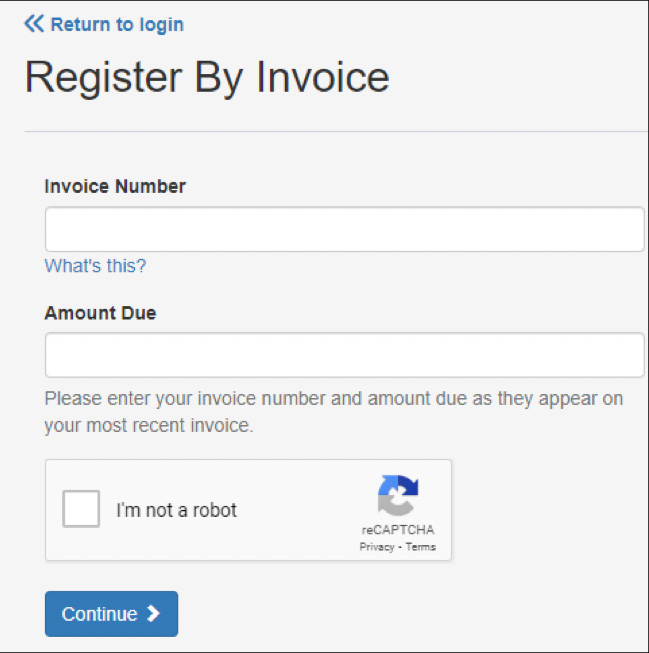
Enter the Invoice Number found on your NCTC bill, and then enter the amount due found on your NCTC bill, as well.
Click “I’m not a robot,” then click to continue.
On the next screen you will enter your email address and be able to create and confirm a password.
Select a security question and enter the answer to the question you selected.
You’ll see the following screen:
Once this is done, an email will be sent to the address entered above. This email should arrive within a few minutes and will contain a link that you need to click on to confirm your email address and complete your registration.
Once you click the link, you will be brought to a webpage that looks like this:
Click “Confirm.”
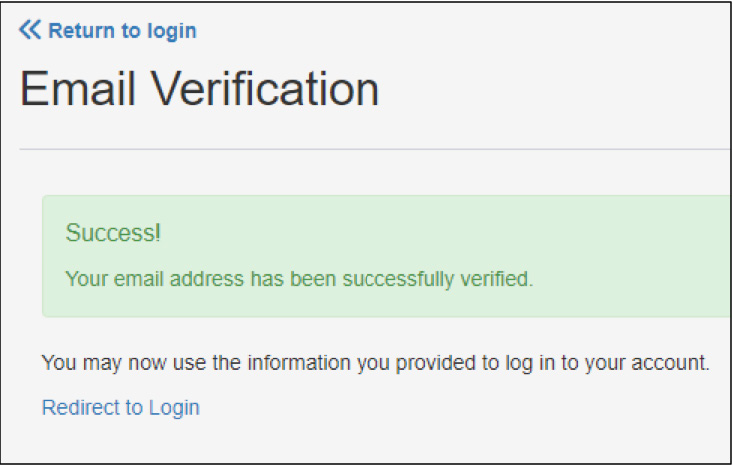
Once you click that, your email will be confirmed, and you will see a page that looks like this:
At this point, your registration is complete, and you will be able to log in, view your bill and make a payment.
If you register for online bill pay, you will automatically be enrolled in paperless billing. To request paper bills, call our customer service team at (615) 666-2151.
NCTC only has two billing due dates: The first and the 15th of each month. However, you can change from one to the other by contacting our customer service team at 615-666-2151
If your service is disconnected for delinquent payment, all previous charges must be paid in full prior to restoration. Restoration charges will appear on your next bill.
Internet
NCTC recommends connecting appropriate devices — such as PCs and gaming consoles — directly to your router. For wireless devices, note that most routers automatically optimize based on where you are in your home in relation to your signal source.
Sometimes, things in your home like microwaves and cordless phones, can interfere with your Wi-Fi. Even your house’s structure, furniture and certain materials can affect the signal. So, where you put your router matters. Sitting the router inside a closet or cabinet, putting something around it or even hiding the device behind a TV can negatively impact signal strength and reliability. If you’re having trouble with your Wi-Fi signal, we first suggest changing the router’s location.
If you’re still having trouble, our support team is available 24/7 by calling 270-622-2056.
30 Mbps
100 Mbps
300 Mbps
500 Mbps
1 Gig (1,000 Mbps)
2 Gigs (2,000 Mbps)*
5 Gigs (5,000 Mbps)*
8 Gigs (8,000 Mbps)*
*Coming soon for all members, available now in certain areas.
With the latest and greatest Wi-Fi 6 Blast router, you can connect more than 250 devices to your home network. Pair that with our unbeatable fiber technology, and you’ll forget the meaning of the word buffering.
Learn more about the Blast on our Wi-Fi page.
You can check your speed on our free NCTC Wi-Fi mobile app, or visit our internet speed test page on the Speed Test website.
The NCTC Blast router provides certified Wi-Fi 6 (802.11ax) technology to eliminate dead spots and give you a faster speed than ever before, along with more security and less signal interference.
With the Wi-Fi 6 Blast router, you’ll notice an improved battery life on your devices. Why is that? The Blast router can tell when your device is in standby mode, so it stops feeding a signal when not in use to prevent unnecessary battery drain.
If you’re a tech fan like we are, you’ll love that the NCTC Blast incorporates 6×6 streams of Wi-Fi delivery (2×2@ 2.4 GHz and 4×4 @ 5Ghz). It also has a multiuser multiple-input and multiple output, also known as MU-MIMO, and beamforming. If you’re wondering if we just did an algebra equation, we’ll put it in simpler terms. It provides unbeatable signal strength within your home. Do you have a home full of devices? This router is for you, as it can connect over 250 devices without affecting your network. In other words, we’re confident this router will get the job done for you.
Click here for more information.
Our Wi-Fi extenders help eliminate interference from sources you might not expect, like microwaves, cordless phones and Bluetooth speakers. Additionally, they can provide an extra boost in larger homes or buildings with concrete walls.
Please note: The Wi-Fi Extender is available only to customers who use the NCTC Wi-Fi 6 Blast router. We cannot support devices we don’t provide.
NCTC WiFi is a free mobile app that gives you everything you need to take control of your network with ease. See connected devices, access basic parental controls, create guest networks, and more, all right from your phone!
Symmetrical speeds refers to your network’s upload and download speeds. Many providers, including NCTC’s competitors, claim to provide high speeds, but if you read the fine print you’ll learn those speeds are not symmetrical. They may have a download speed of 100 Mbps but only 15 Mbps of upload speed. You never have to worry about that with fiber from NCTC.
Yes!
No.
Do not press the reset button on the back of your router. Contact technical support for assistance at (270) 622-2056.
Email Support
Incoming Mail Server: mail.nctc.com
Outgoing Mail Server: mail.nctc.com
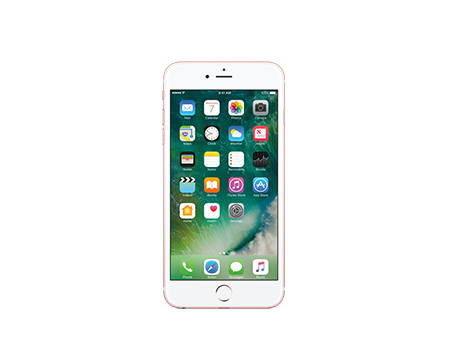
iOS/iPhone/iPad
iOS Devices: IMAP Configuration
Go into the Settings icon.
Select Mail.
Select Accounts.
Select Add Account.
Select Other.
Select Add Mail Account.
Enter in your Name: (Ex. Jon Doe)
Enter your Email Address and Password: (Ex. user@nctc.com)
Enter a Description (Ex. NCTC Email) and Click Next
Select Save.
Depending on the connection, you may need these additional settings:
Under the Incoming Mail Server add the following:
Host Name: mail.nctc.com
User Name: (Ex. user@nctc.com)
Password: (Access Account Password)
Under Outgoing Mail Server, add the following:
Host Name: mail.nctc.com
User Name: (Ex. user@nctc.com)
Password: (Access Account Password)
Select Save.
Android
Open the Email app and navigate to the Settings section.
Tap Select Others.
Enter your full email address and password.
Select Manual Setup
Select IMAP
Incoming Server: mail.nctc.com
Security Type: TLS (Accept all certificates) and Select Accept
Outgoing Server: mail.nctc.com
Security Type: TLS (Accept all certificates)” and Select Accept
Verify ‘Require authentication to send email’
Email address and password should already be prefilled
Once the settings are entered , tap Next
Windows/Mac
Open Windows Live Mail. On Windows Live Mail toolbar, click File (1), then go to Options (2), and click Email accounts (3).
Now click on Add
Select Email Account, then click Next
Under Logon Information:
In the Email address box, enter your full email address.
In the Password box, enter your email password. If you want Windows Live Mail to remember your password, make sure the check box next to Remember this password is selected.
In the Display name box put your name
Click Manually configure server settings, and then click Next.
Provide the following information on the Configure server settings page.
Under Server Type, select IMAP.
In the Incoming mail server box, enter the IMAP server name:
IMAP: mail.nctc.com Port: 993
Do NOT click Requires a secure connection (SSL) (Remove)
DO select Requires Authentication
Under Authenticate Using, select Clear text
In the Outgoing server information
The Server Address is mail.nctc.com Port 465
Again, as mentioned above, DO select Requires Authentication
In the Logon user name box, enter your Full Email Address: i.e. yourusername@nctc.com
Click Next
On the Your email account was added page, click Finish.
On the Account Settings page, click Close.
Open Outlook 2019. If this is the first time you have opened Outlook, you will be directed to the new account wizard.
When the Welcome to Outlook 2019 box opens, enter your email address and click Advanced options
Check the box for the option Let me set up my account manually and then click Connect.
In the Choose account type window, select IMAP.
Enter the following settings then click Next:
Incoming mail:
Server: Enter mail.nctc.com
Port: 993 for IMAP
Encryption method: SSL/TLS
Require logon using Secure Password Authentication (SPA): Unchecked
Outgoing mail:
Server: mail.nctc.com
Port: 587
Encryption method: STARTTLS
Require logon using Secure Password Authentication (SPA): Unchecked
Click Next
Enter your mailbox password, then click Connect.
Your account should now be set up and ready to use, click OK to close the wizard. Outlook 2019 is now configured to send and receive email through your mailbox.
In Mozilla Thunderbird, from the Tools menu select Account Settings.
Select Email account, and then click Next.
Enter your name and e-mail address.
Select IMAP as the type of incoming server you are using.
Your incoming server is mail.nctc.com for IMAP.
Click Next.
Enter your e-mail address for the Incoming User Name, and Outgoing User Name. Click Next.
Enter a name for your email account and click Next.
Verify your account information and click Finish.
In the Account Settings window, select Outgoing Server listed below your new account.
Type mail.nctc.com for the Server Name and change the Port setting to 587
Select User name and password and enter your e-mail address.
Thunderbird will ask you for your password the first time you try to send mail. Click OK.
Your account should now be set up and ready to use. Mozilla Thunderbird is now configured to send and receive email through your mailbox.
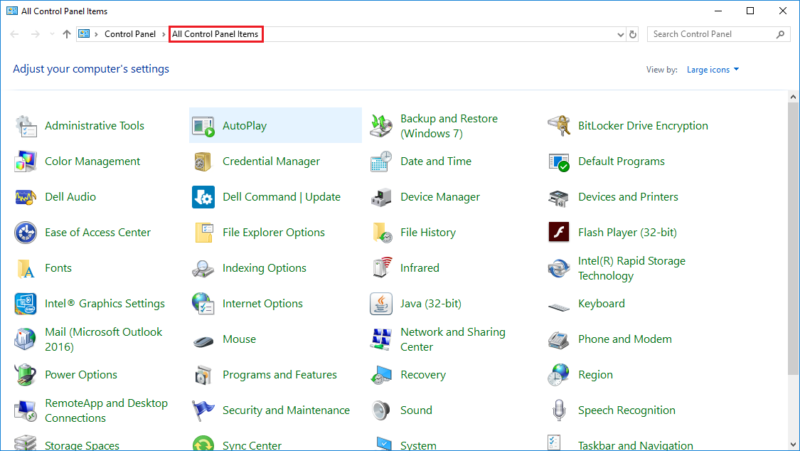
1. Open the “Control Panel” by searching for it in the search bar next to the Start Button.
2. Ensure that “All Control Panel Items” is your active view at the top of the window.
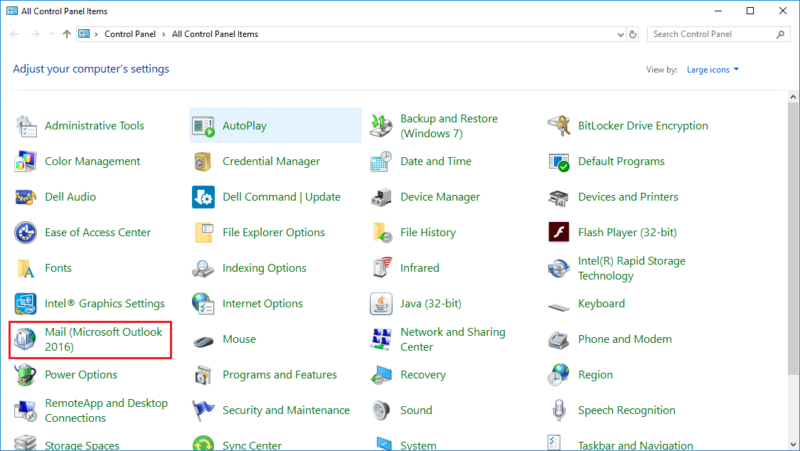
3. Click on the “Mail (Microsoft Outlook…)” icon.
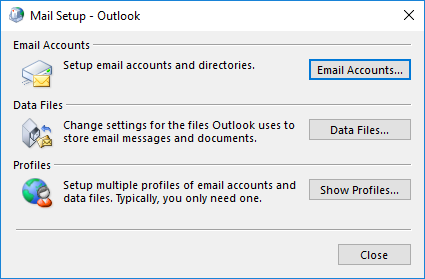
4. In the “Mail Setup – Outlook” dialog box, click “Email Accounts…”.
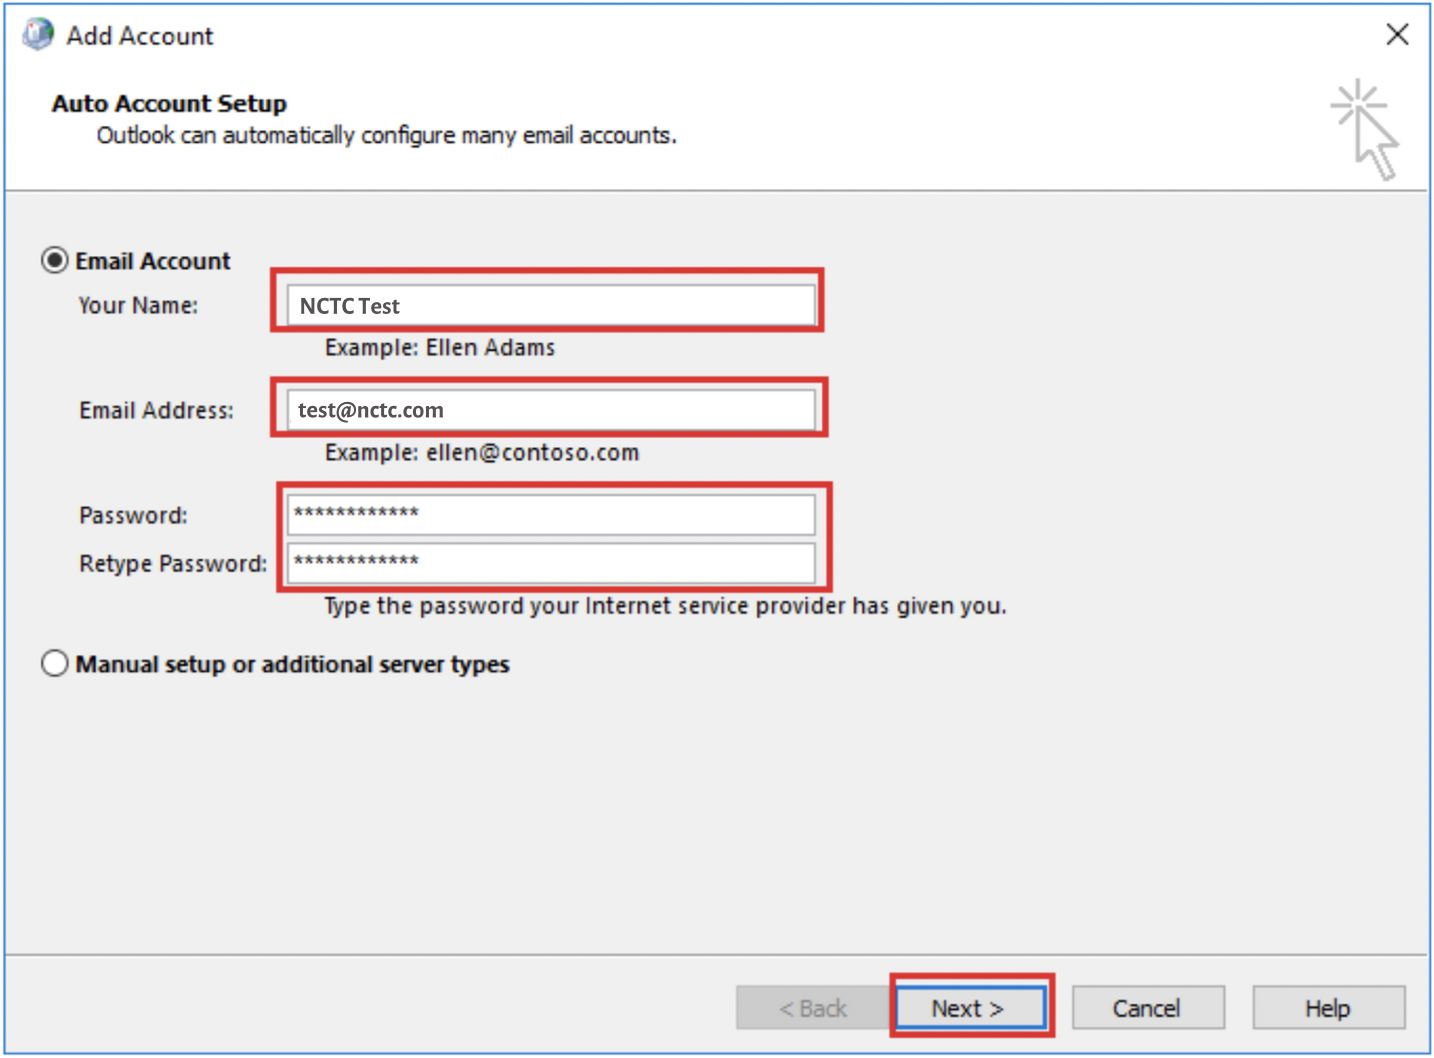
5. On the Add Account window that shows up afterwards, fill out the
fields:
– Your Name:
– Email Address:
– Passwords:
– Retype Password:
Then click on the “Next” button.
NOTE: If the auto-configuration process doesn’t work, see the section below for manual configuration instructions.
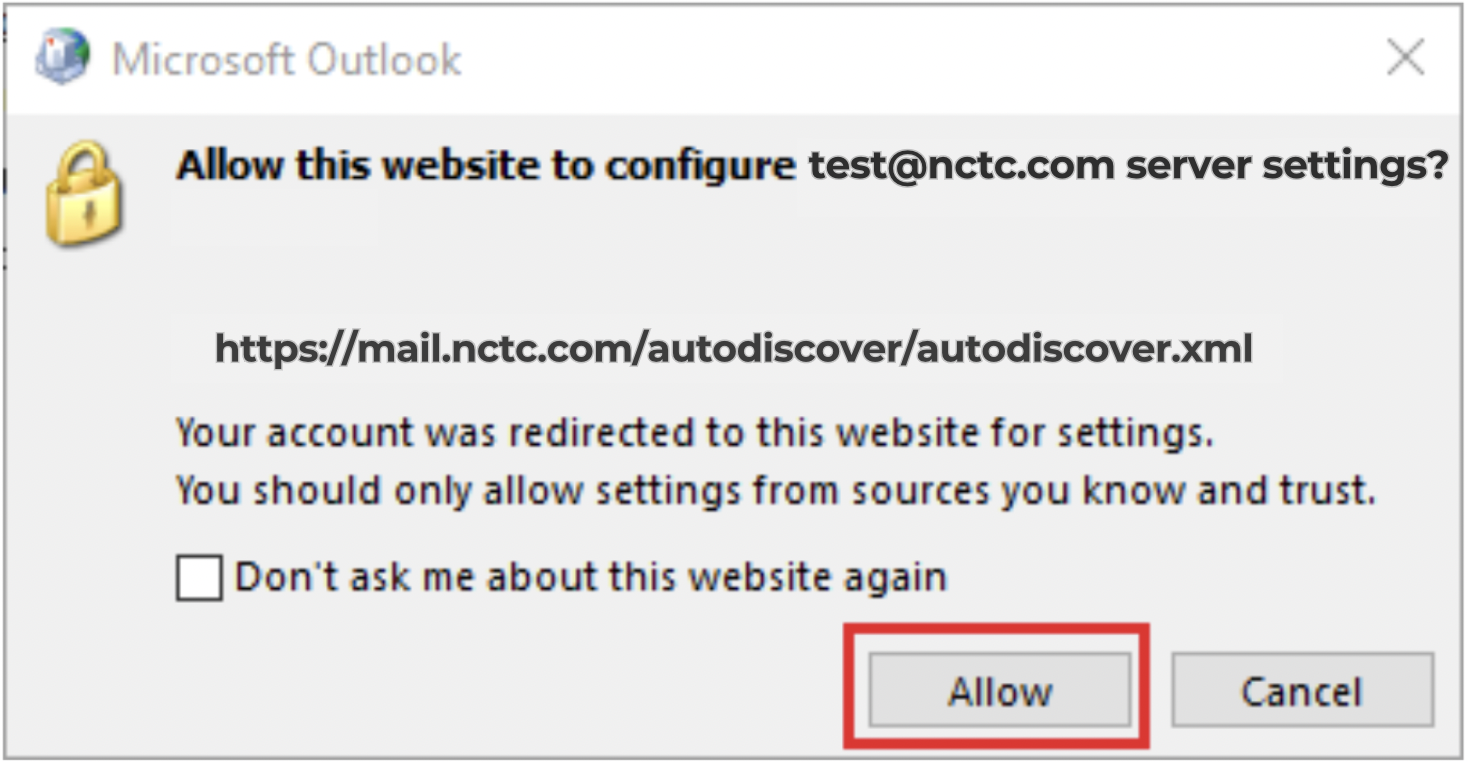
6. A dialog box asking to configure server settings may appear, if so, click “Allow”.
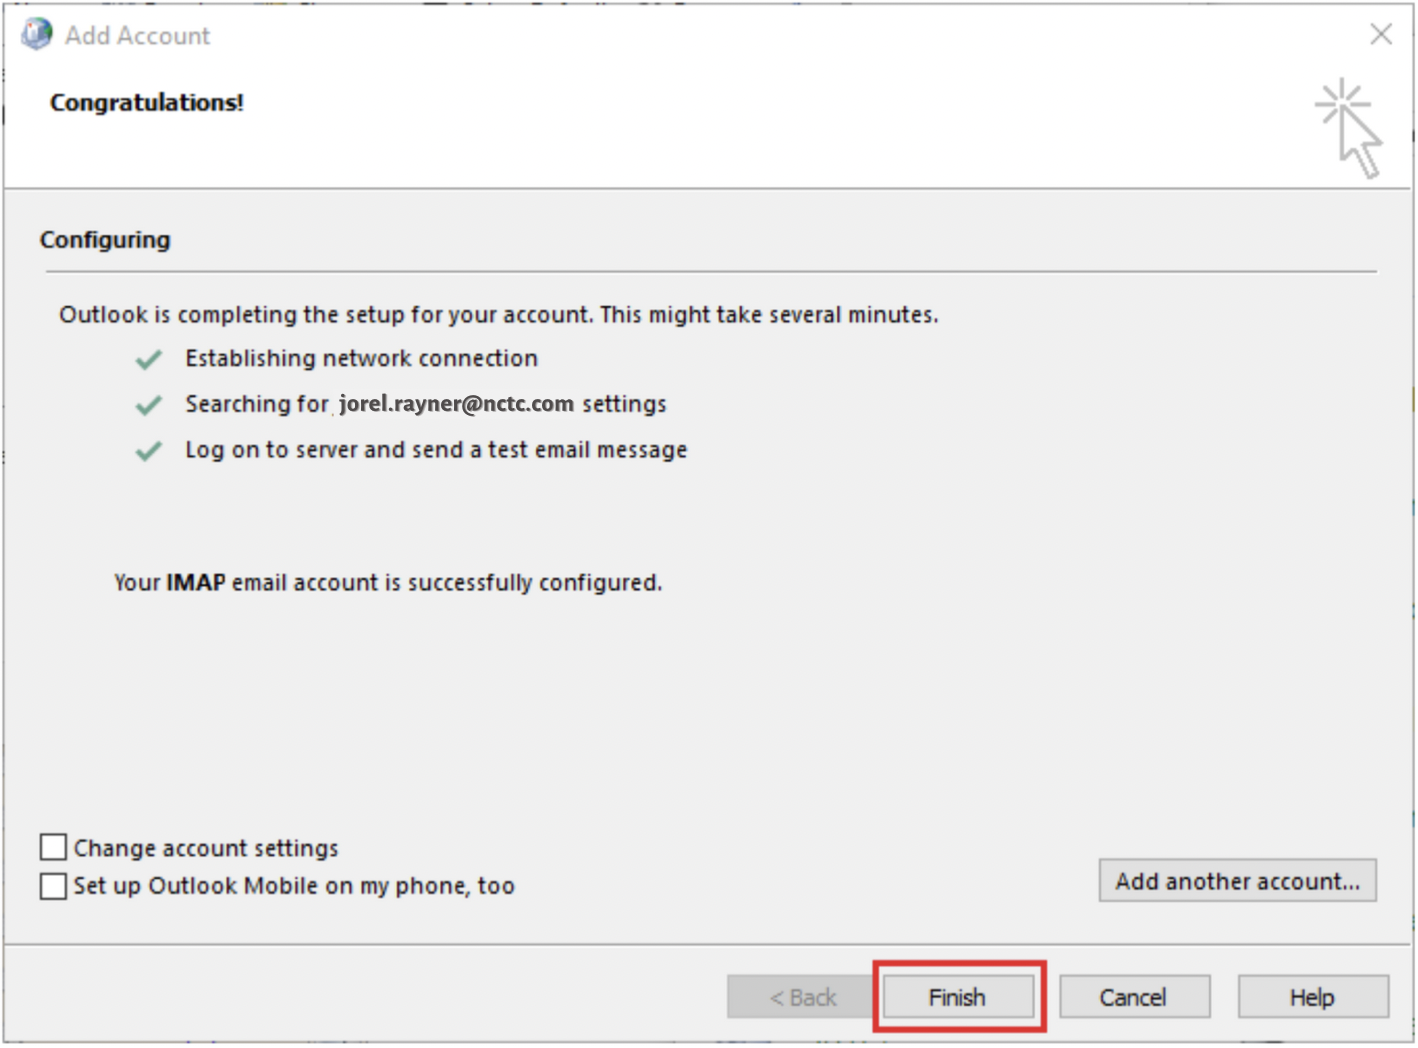
7. A dialog box should appear next checking off the configuration process. After the configuration is done, it should say the email is successfully
configured. Click “Finish”
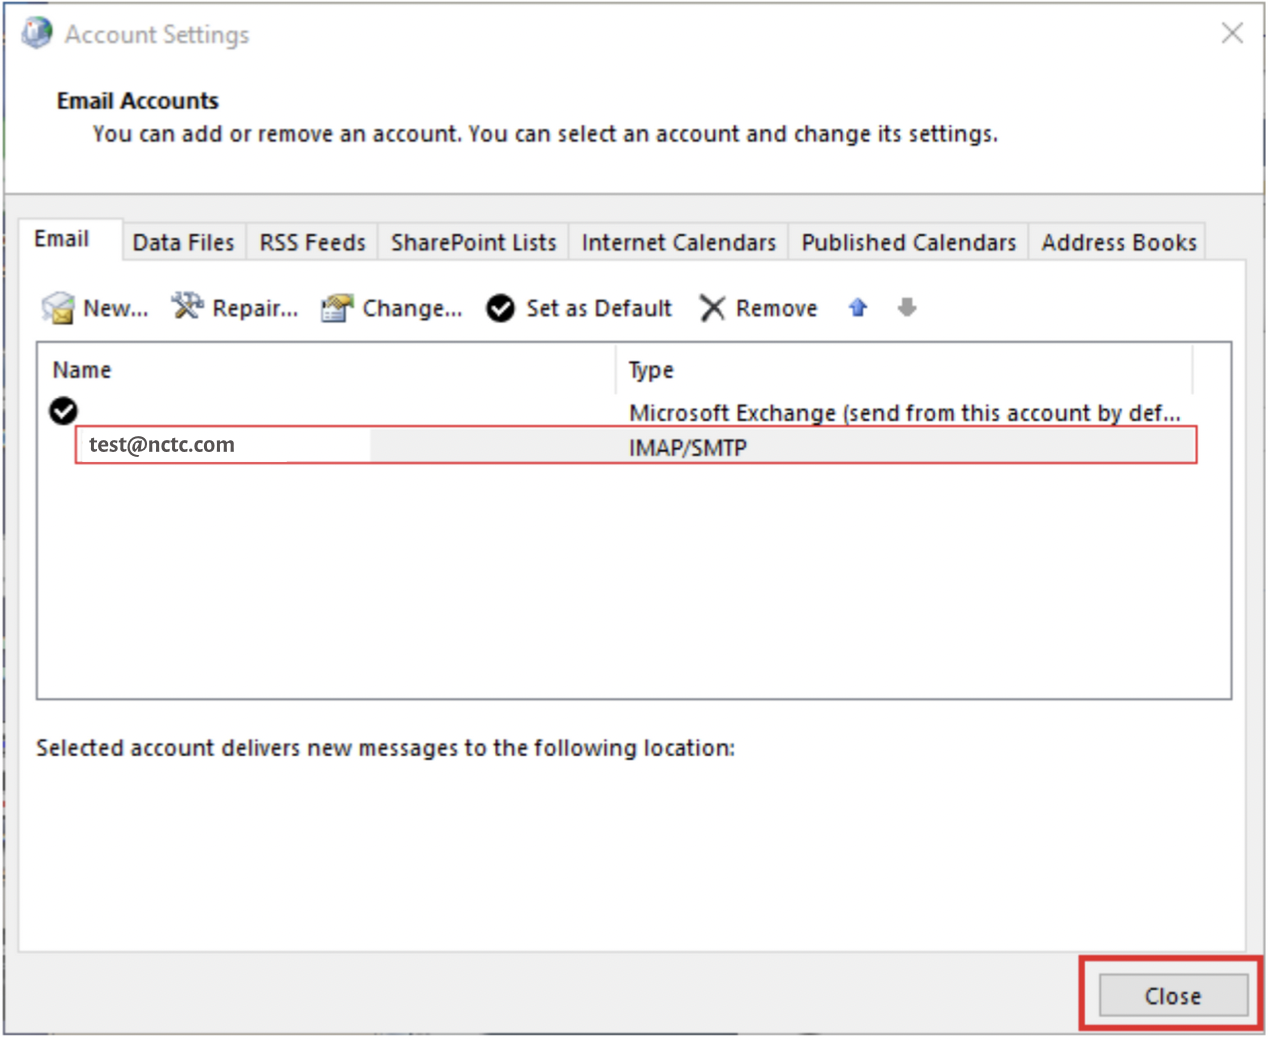
8. You should be met with the Account Settings dialog box and the new email address should be on the list. Click “Close”.
9. Open Outlook as normal to view your mail.
Manual Email Configuration
If the auto-configuration doesn’t work, you can choose to do a manual account setup. To do so, follow the steps below:
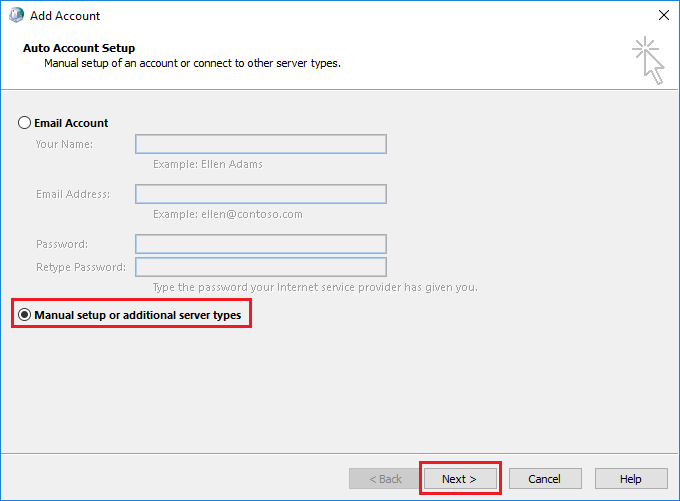
1. At the “Add Account” dialog box, select the option “Manual setup or additional server types” and click “Next”.
2. For the account type, click the “POP or IMAP” radio button and click “Next”.
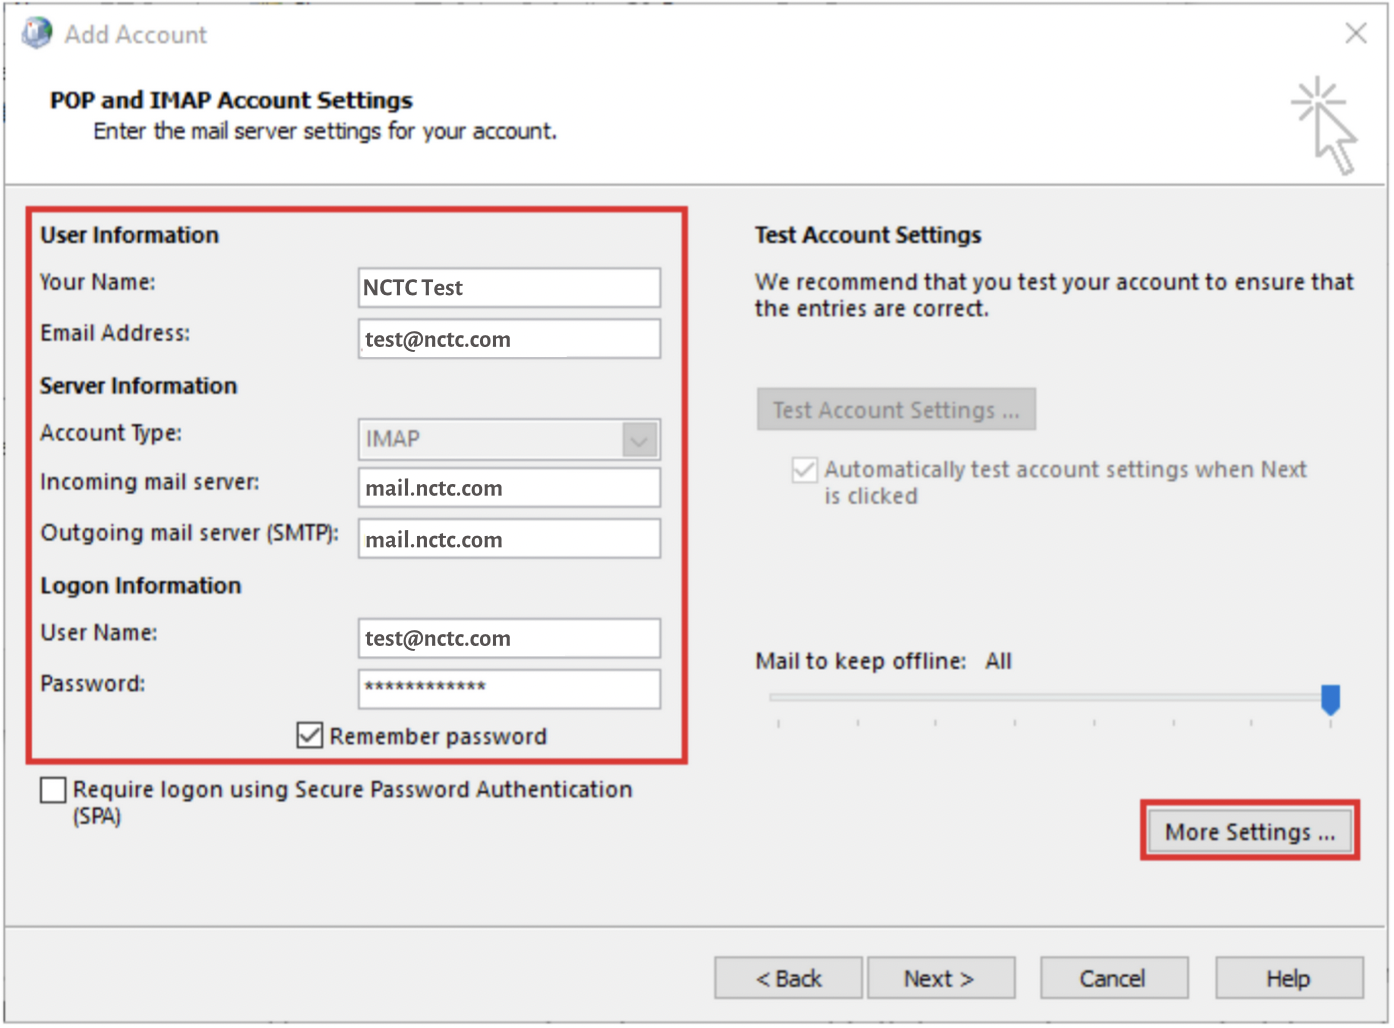
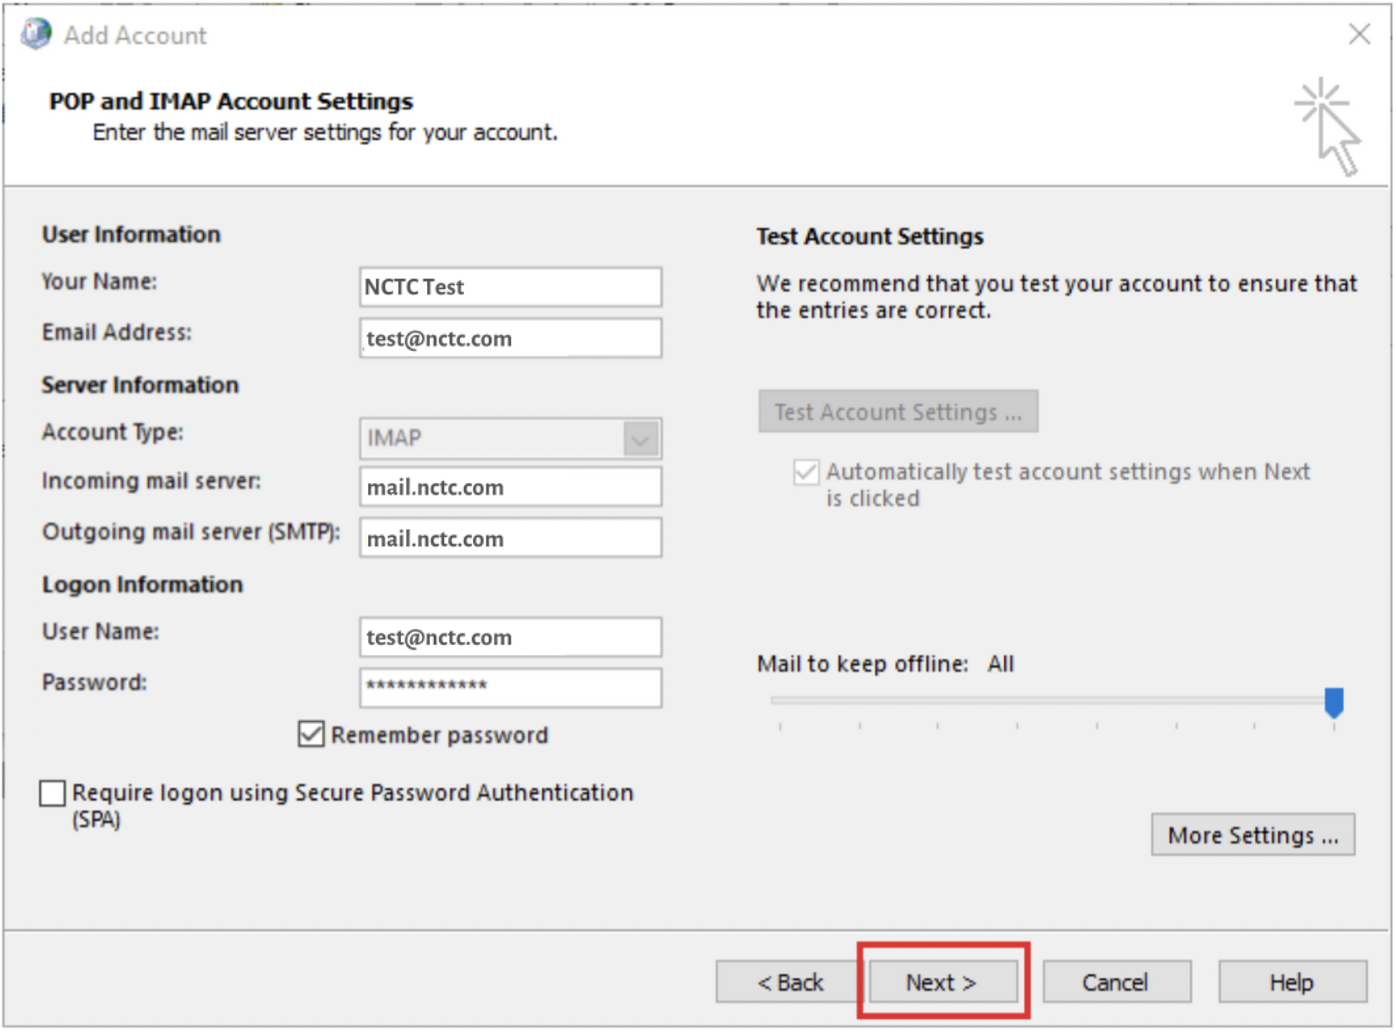
3. Input the required information using the image below as a template. Click “More Settings…”.
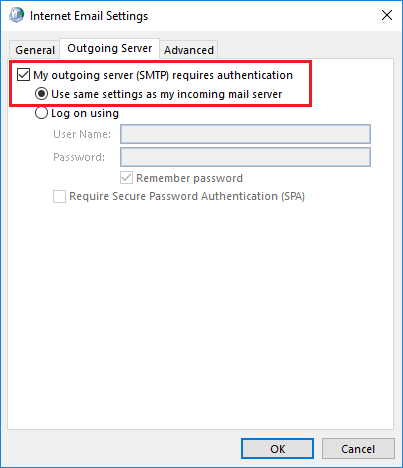
4. Click the “Outgoing Server” tab.
5. Ensure the “My outgoing server (SMTP) requires authentication” checkbox is checked and the “Use the same settings as my incoming mail
server” radio button is filled.
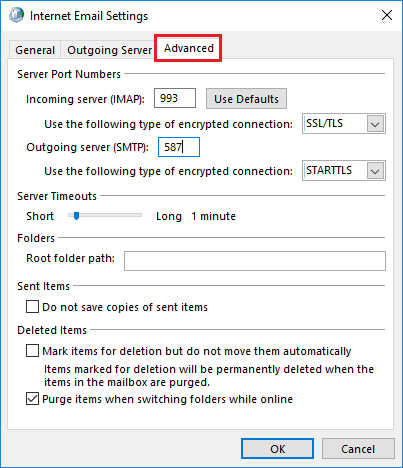
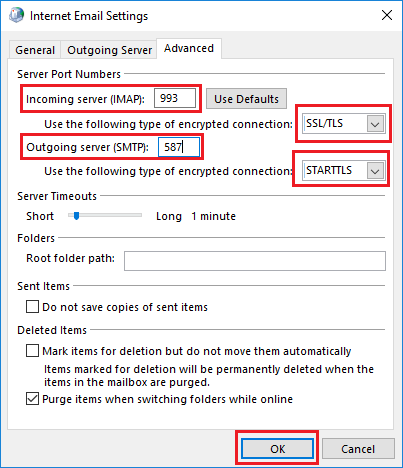
6. Click the “Advanced” tab.
7. Make sure the server settings are set as such and Click OK:
Incoming Server (IMAP): 993
Use the following type of encrypted connection: SSL/TLS
Outgoing Server (SMTP): 587
Use the following type of encrypted connection: STARTTLS
8. Back at the account settings, click “Next”.
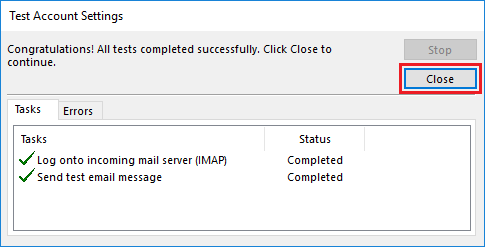
9. A “Test Account Settings” dialog box will appear and automatically run two tests. Once they are completed, click “Close”.
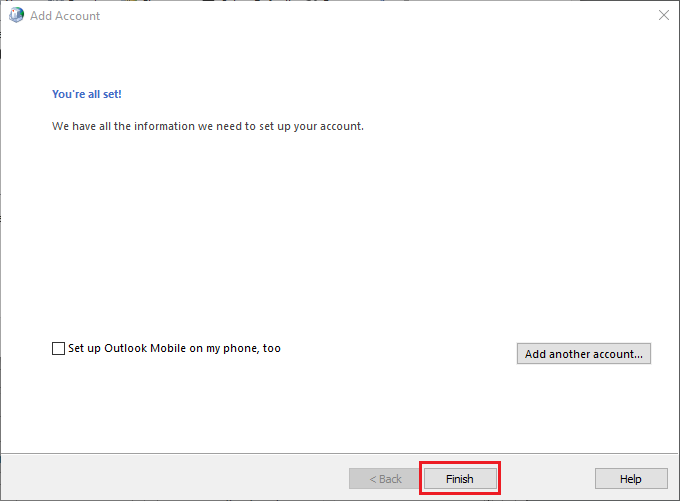
10. The next dialog box will say “You’re all set!”, click “Finish”.
11. The new email account will now be listed, click Close.
12. You can now access your email as normal.
Television
1. Unbox the Roku Stick:
Open the box and take out the Roku Stick, remote control, power adapter and any other included accessories.
2. Connect the Roku Stick to your TV:
Plug the Roku Stick into an available HDMI port on your TV. If your TV has multiple HDMI ports, take note of the port number you used.
3. Power the Roku Stick:
Use the provided USB power cable and connect one end to the Roku Stick and the other end to either the USB port on your TV or the included power adapter. If you’re using the power adapter, plug it into a power outlet.
4. Turn on your TV:
Use your TV remote to turn on the television.
5. Select the correct HDMI input:
Use the input or source button on your TV remote to select the HDMI input to which the Roku Stick is connected.
6. Set up the Roku remote:
Insert the included batteries into the Roku remote.
7. Pair the remote with the Roku Stick:
The Roku Stick should automatically pair with the remote. If it doesn’t, press and hold the pairing button located inside the remote’s battery compartment until the pairing light on the remote begins to flash.
8. Choose the display type:
Follow the on-screen instructions to select your display type (HD or 4K) and confirm the best resolution for your TV.
9. Connect to the internet:
Select your Wi-Fi network from the list of available networks. Enter your Wi-Fi password if prompted.
10. Update the Roku software:
The Roku Stick will automatically check for and install any available software updates.
11. Sign in or create a Roku account:
If you already have a Roku account, sign in using your credentials. If not, follow the on-screen instructions to create a new account.
12. Link your Roku device:
Follow the instructions to link your Roku Stick to your Roku account. This step is necessary for activating your device.
13. Add channels:
Browse the Roku Channel Store and add your favorite channels. Channels are apps that provide content on Roku.
14. Complete the setup:
Once everything is set up, you should see the Roku home screen. Your Roku Stick is now ready to use.
Unbox and connect hardware
Unbox your Amazon Fire Stick and make sure you have all the necessary components: Fire Stick, remote control, power adapter and HDMI extender.
Plug the Fire Stick into an available HDMI port on your TV.
Connect the included USB power cable to the Fire Stick and plug the other end into the power adapter.
Plug the power adapter into a power outlet using the provided power cable.
Turn on your TV:
Power on your TV and select the HDMI input to which the Fire Stick is connected.
Pair the Remote:
The Fire Stick remote should automatically pair with the Fire Stick, but if it doesn’t, press and hold the Home button for about 10 seconds until the light on the remote starts flashing. This indicates it’s in pairing mode, and it should connect to the Fire Stick.
Select Language and Connect to Wi-Fi:
Follow the on-screen instructions to select your preferred language.
Connect the Fire Stick to your Wi-Fi network by entering your Wi-Fi credentials.
Sign in with your Amazon Account:
If you already have an Amazon account, sign in with your email and password. If not, create a new account.
Install Streaming Apps:
Once the setup is complete, you can start installing streaming apps. Navigate to the Apps section on the Fire Stick home screen.
Browse or search for the apps you want, for example Netflix, Hulu or Prime Video, and install them.
Programming Entone (Nova) remote control to television:
Step 1—Turn on your device. Step 2—On the remote control, press the corresponding Device Control key (TV/STB/DVD/AUX) to choose the device mode. Step 3—Press and hold SETUP key until the LED blinks twice. Step 4—Press number keys 991. Step 5—Press Power key. Step 6—Press CH+ key repeatedly until your device turns off. Step 7—Press and hold SETUP key until LED blinks twice to save the working code. For detailed manufacturer’s instructions, click here: Entone Nova Manufacturer’s Instructions (PDF)
Programming Entone v4.x (black, peanut-shaped) remote control to television:
Step 1 —Power on the device. On the remote control, press and hold TV for five seconds. Once the button illuminates, release. Step 2 —Press POWER once, and aim your new remote at the TV. Step 3 —Press either CHANNEL UP or CHANNEL DOWN to perform a device autoscan. Step 4 —In this search mode, the remote control will send IR codes from the library in five-second intervals. The TV key will be on and blink every five seconds while in the TV scan mode. Step 5 —If the TV turns off, a working code has been found. Press OK once to lock in the code. The selected mode key will blink twice. Step 6 —If all code sets of that device are exhausted in the search and OK is not pressed, the TV key will quickly blink seven times and the search mode will be terminated. Step 7 —For more detailed instructions, click here: Entone v4.x Remote Control Instructions (PDF) For complete manufacturer’s instructions, click here: Entone Universal Remote Control 4 User’s Guide (PDF)
Programming Entone v3.x (silver, bar-shaped) remote control to television:
Step 1 —Power on the device. On the remote control, press the TV key once. Then press and hold SETUP until the device key blinks twice, then release SETUP. Step 2 —Press POWER once, and aim your new remote at the TV. Step 3 —Press either CHANNEL UP or CHANNEL DOWN to perform a device autoscan. Step 4 —In this search mode, the remote control will send IR codes from the library in five-second intervals. The device key will be on and blink every five seconds while in scan mode. Step 5 —If the device turns off, a working code has been found. Press OK once to lock in the code. The selected mode key will blink twice. Step 6 —If all code sets of that device are exhausted in the search and OK is not pressed, the selected device key will quickly blink seven times, and the search mode will be terminated. Step 7 —For detailed manufacturer’s instructions, click here: Hydra Remote Control Instructions (PDF)
Press the LANG or CC button on your remote. This toggles several different options. Keep pressing until you arrive at your desired CC option, including languages or to turn it off completely.
Click here for information on setting up parental controls on your television: Parental Controls (PDF)
Telephone
Selective Call Acceptance allows you to screen incoming calls by creating a list of phone numbers from which you want to accept calls. Calls not on this list would receive an announcement that informs the caller that you are not receiving calls from them at this time.
Dial *64, listen to the voice instructions which will guide you through the steps of how to:
Turn Selective Call Acceptance on or off.
* Make changes to your Selective Call Acceptance list.
Dial if you want to:
0: Repeat the instructions
3: Turn service off/on
1: Review the numbers on your list
Immediately after hearing a number listing, dial 07 to delete that entry. While in list review, dial 3 to turn Selective Call Acceptance on.
You will see an email from “voicemail@nctc.com.” The actual voicemail will be delivered as an attachment, and the body of the email will allow you to Save or Delete the voicemail message.
Yes. There are 2 ways you can access from your phone.
From your browser, go to our Voicemail page. The Voicemail Portal button on this page will take you to the web portal.
Your first new message may play immediately. If not, press 1 to listen to your messages. You will hear the announcement, “You have xx new messages and xx saved messages.”
Press 1 to listen to new messages.
Press 2 to listen to saved messages.
When retrieving messages, you can:
Press 1 to play the message again.
Press 2 to save the message and play the next.
Press 3 to delete the message and play the next.
Press 4 to save the message as new.
Press 5 to reply to the message.
Press 6 to forward the message to another mailbox.
Press 7 to skip backward in the message.
Press 8 to pause the message.
Press 9 to skip forward in the message.
Lift the receiver, and enter 1 + area code + number. Promptly after entering the number but just before the System Announcement, enter your PIN (set by NCTC) to complete the call.



 You can click the “What’s This?” link to help identify where you can find the Invoice Number and Amount Due on your bill:
 Enter the Invoice Number found on your NCTC bill, and then enter the amount due found on your NCTC bill, as well.
Click “I’m not a robot,” then click to continue.
On the next screen you will enter your email address and be able to create and confirm a password.
Select a security question and enter the answer to the question you selected.
You’ll see the following screen:
Enter the Invoice Number found on your NCTC bill, and then enter the amount due found on your NCTC bill, as well.
Click “I’m not a robot,” then click to continue.
On the next screen you will enter your email address and be able to create and confirm a password.
Select a security question and enter the answer to the question you selected.
You’ll see the following screen:
 Once this is done, an email will be sent to the address entered above. This email should arrive within a few minutes and will contain a link that you need to click on to confirm your email address and complete your registration.
Once you click the link, you will be brought to a webpage that looks like this:
Once this is done, an email will be sent to the address entered above. This email should arrive within a few minutes and will contain a link that you need to click on to confirm your email address and complete your registration.
Once you click the link, you will be brought to a webpage that looks like this:

 Click “Confirm.”
Once you click that, your email will be confirmed, and you will see a page that looks like this:
Click “Confirm.”
Once you click that, your email will be confirmed, and you will see a page that looks like this:
 At this point, your registration is complete, and you will be able to log in, view your bill and make a payment.